Articles

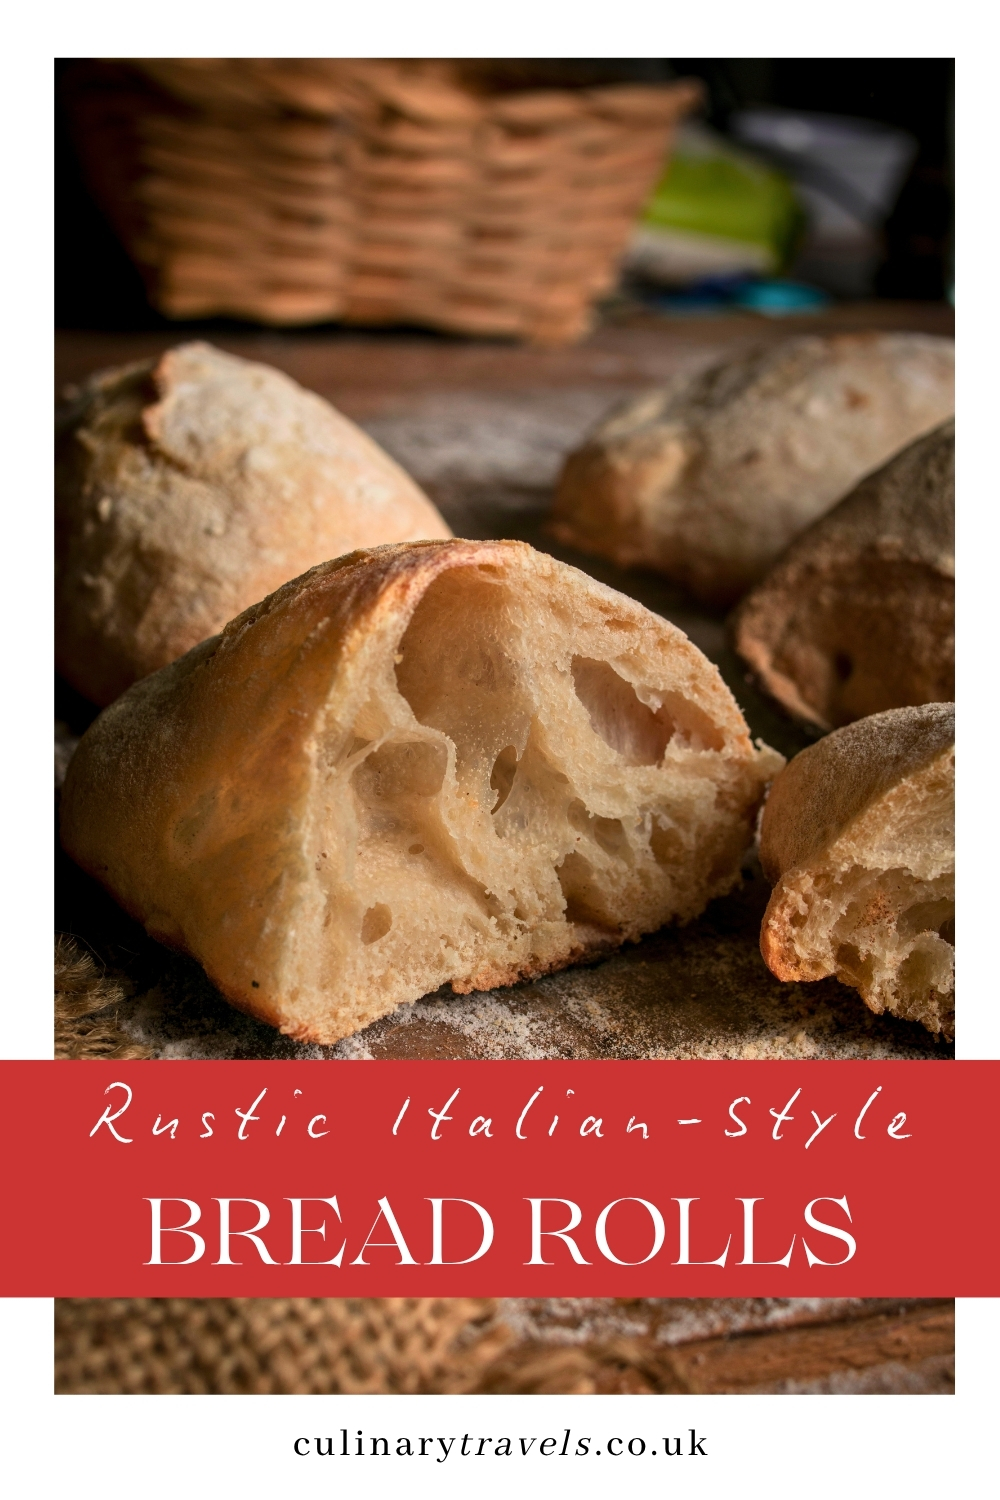
No-Knead Ciabatta Rolls: Rustic Italian Bread Made Easy
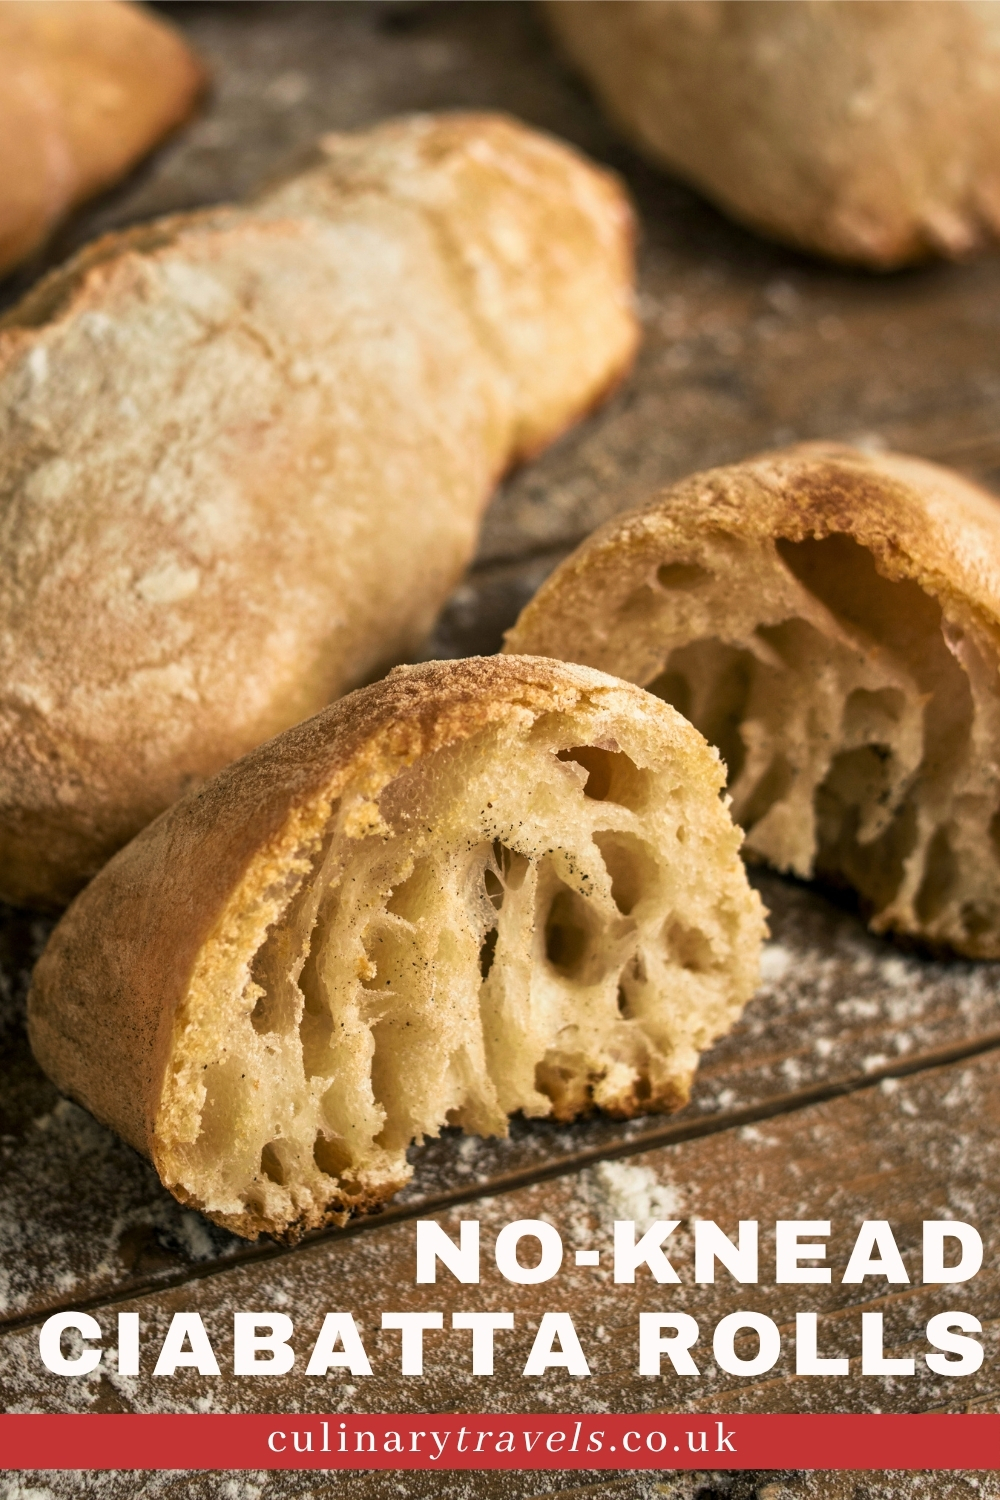
A good ciabatta roll is the kind of bread you return to again and again: crusty enough to crackle when you tear it open, chewy enough to hold a substantial filling, and simple enough to make with flour, water, salt, yeast and a little patience.
These no-knead ciabatta rolls remind me of the kind of bread I always hope for in Italy: rustic, flour-dusted and made for generous sandwiches, whether that means porchetta tucked into warm bread in Rome, a simple tomato and mozzarella filling, or something to sit beside a slow-cooked sauce at the table.
The original version of this post was published years ago, when no-knead bread recipes were having a real moment online. This refreshed version keeps the appeal of that slow, low-effort method, but turns the recipe into something far more practical for a home kitchen: individual ciabatta rolls with a crisp crust, a chewy middle and enough character to make even a simple lunch feel special.
Some articles on Culinary Travels may contain affiliate links, meaning I may earn a small commission at no extra cost to you. I only recommend places, experiences and products that fit the editorial tone and standards of the site.
Update note: This recipe was originally published in November 2015 and has been fully rewritten, updated and rephotographed in June 2026. This version is designed as individual ciabatta rolls for home ovens.
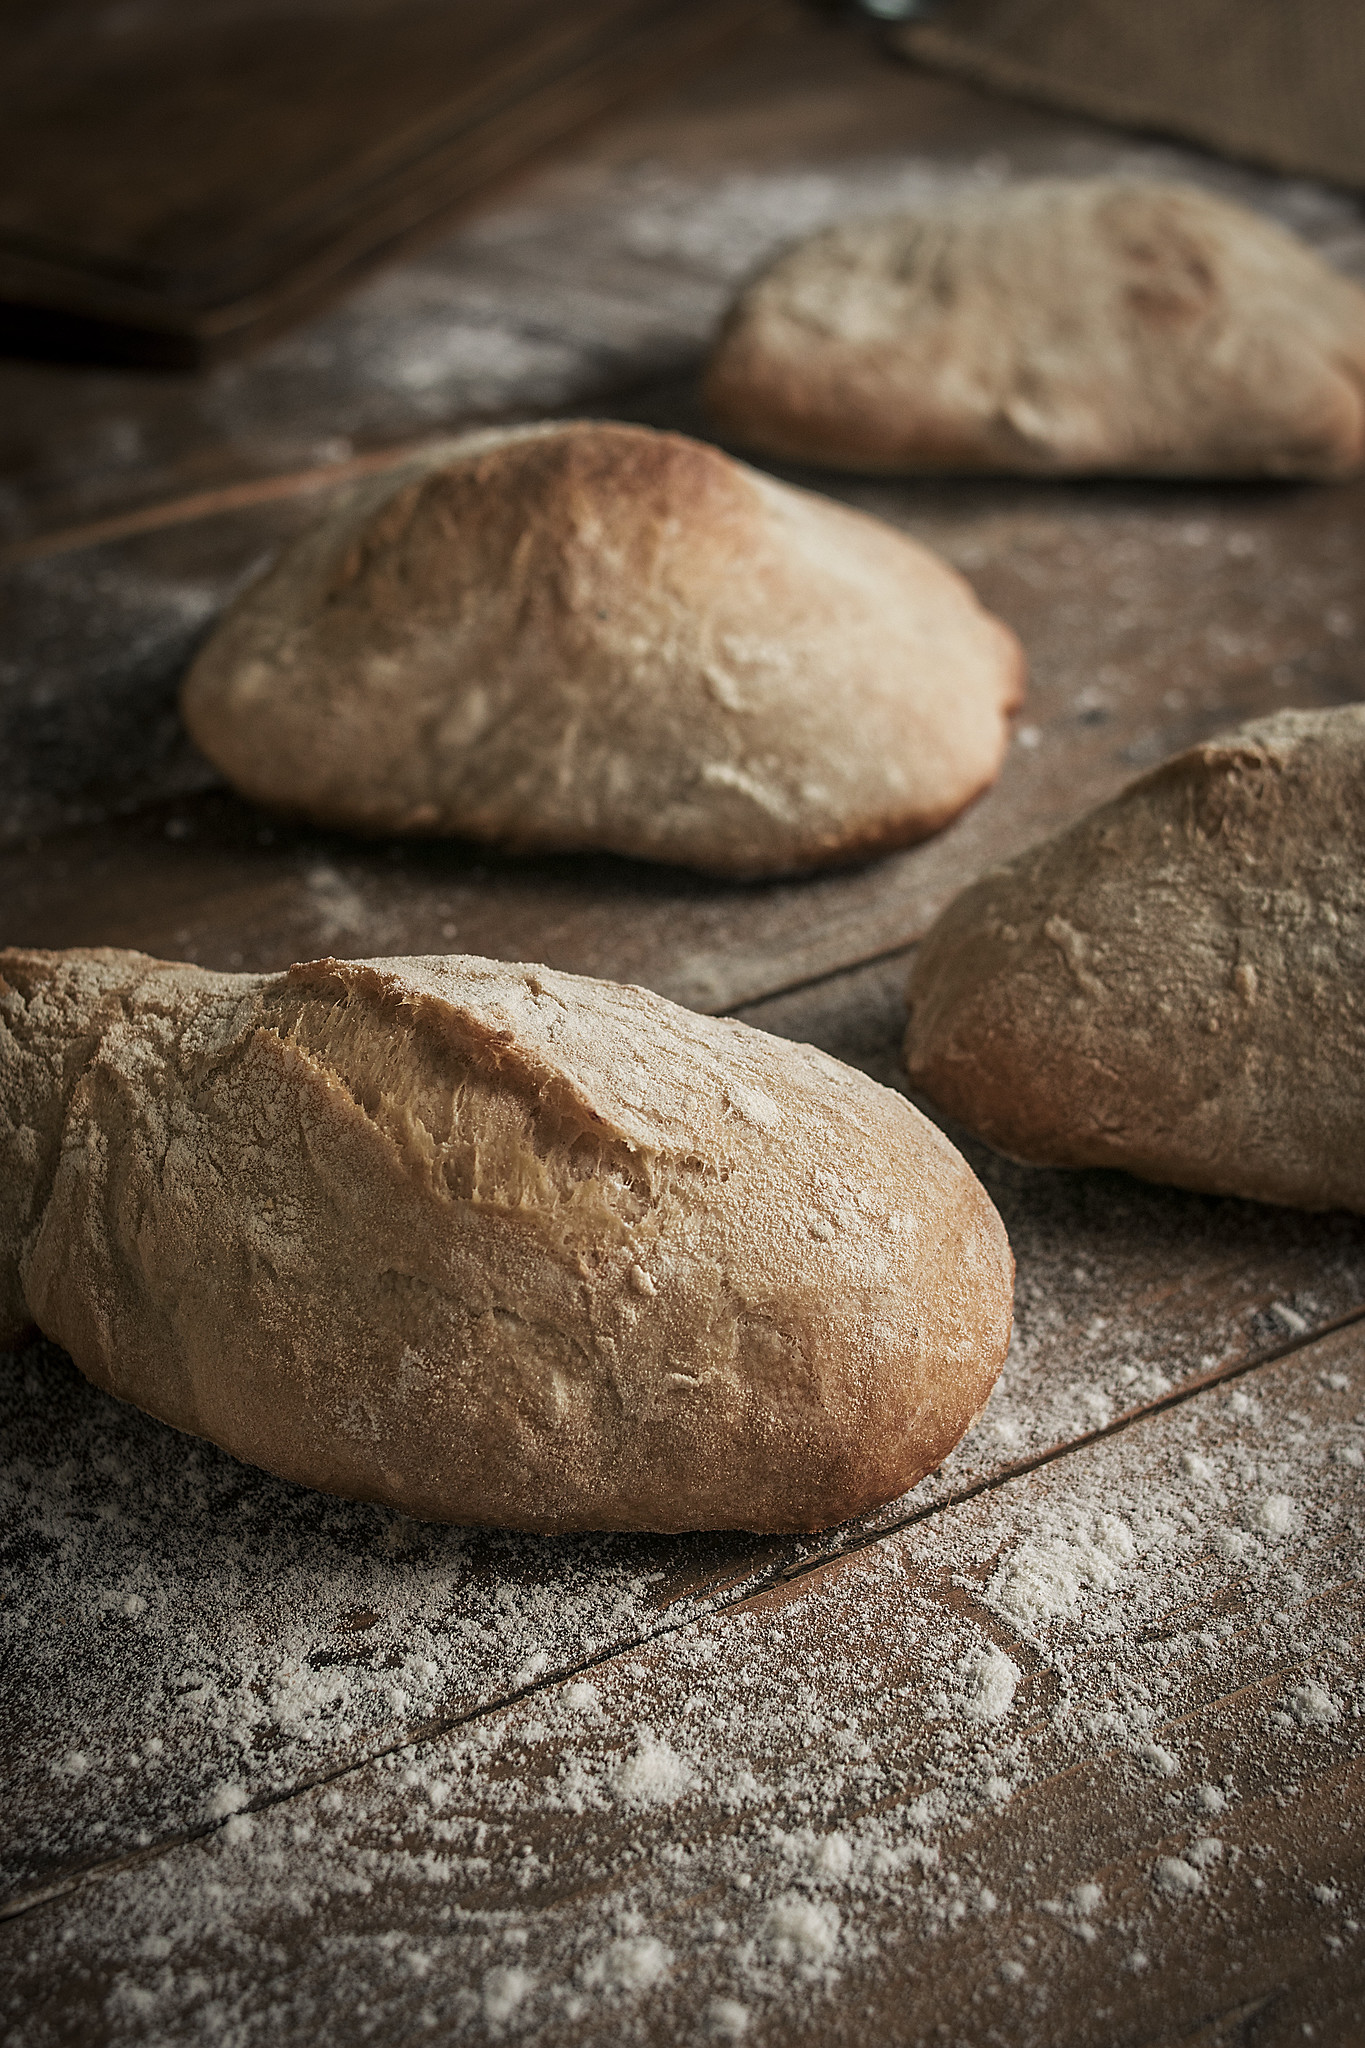
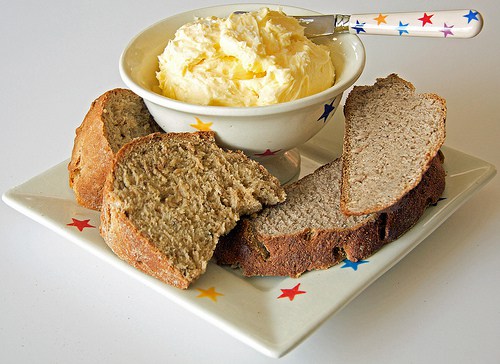
Ciabatta is not a bread that asks to be neat. The dough is wet, the shaping is rustic and the finished rolls should look a little irregular rather than perfectly uniform. That is part of the joy. What you want is a flour-dusted crust, an airy crumb and a roll sturdy enough for sandwiches, soups, antipasti, or whatever lovely thing you happen to be putting on the table.
This is an overnight recipe, but not a difficult one. Most of the work happens while the dough rests quietly on the counter. A little mixing, a couple of gentle folds, a long rise and a hot oven are enough to turn flour, water, salt and yeast into rustic Italian-style bread rolls worth planning lunch around.
Photograph: Maxi Gagliano
Why you’ll love these ciabatta rolls
These ciabatta rolls are properly low-effort. The dough needs time, but very little hands-on work. Most of the flavour and texture develops during the long overnight rise.
They are designed for home ovens. Instead of trying to wrestle large ciabatta loaves onto a domestic baking tray, this recipe makes individual rolls that are easier to shape, bake and serve.
The texture is worth the wait. You get a crisp, flour-dusted crust with a chewy, open crumb inside.
Photograph: Maxi Gagliano
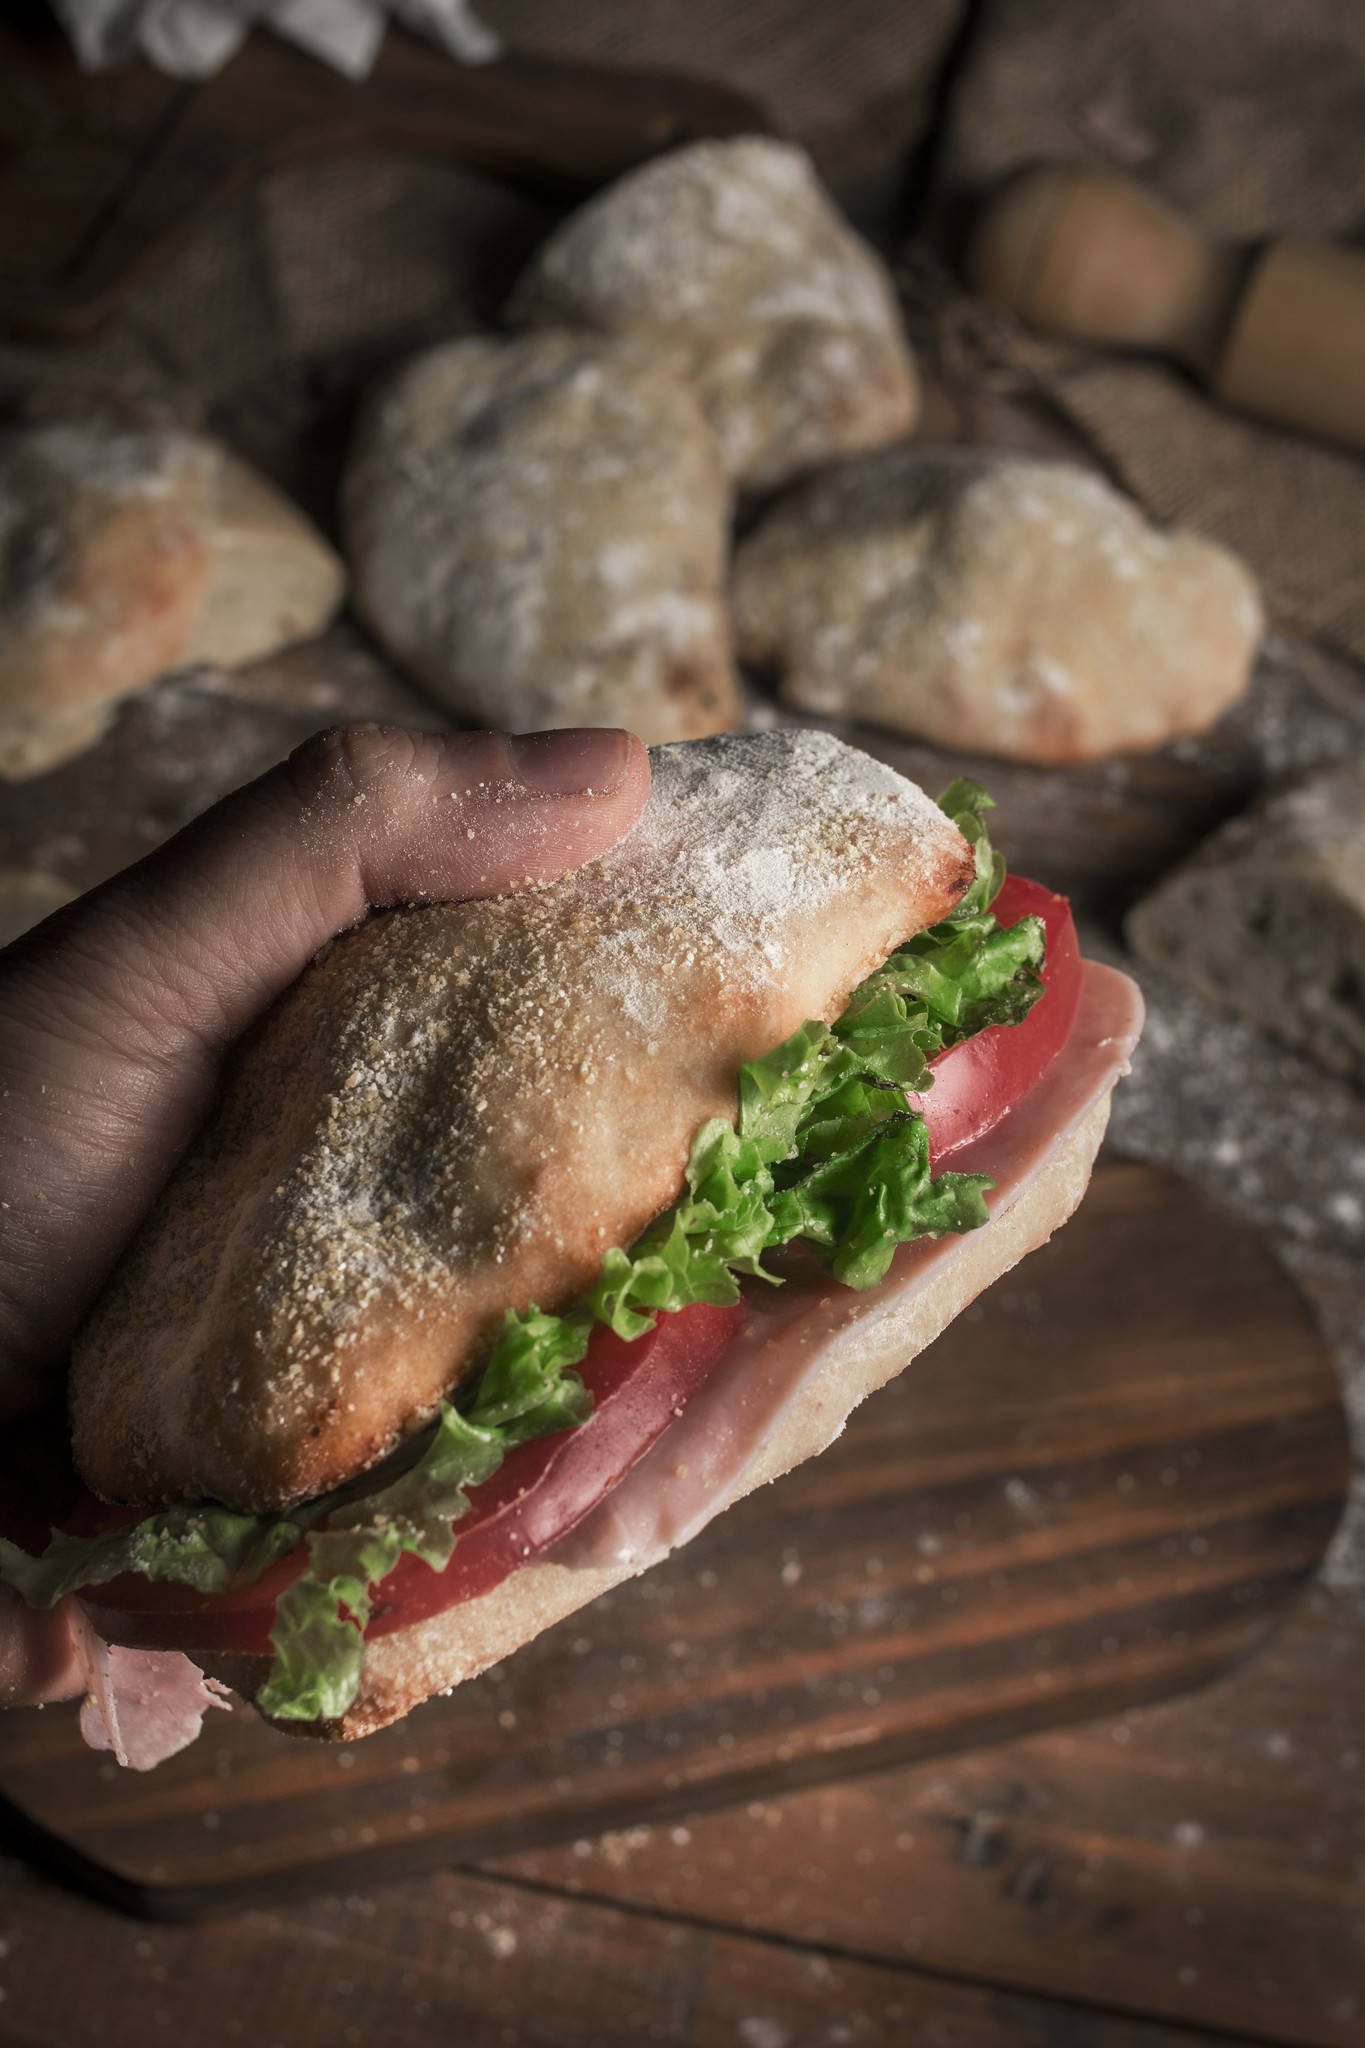
They are brilliant for sandwiches. These rolls are sturdy enough for generous fillings, from tomatoes and mozzarella to roasted vegetables, antipasti or porchetta-style pork.
They freeze well too. Bake a batch, enjoy some fresh, then freeze the rest for easy lunches, soups and weekend meals.
They feel a little bit Italian without being complicated: flour, water, salt, yeast, a long rise and a hot oven. Nothing fussy, but very satisfying.
Photograph: Maxi Gagliano
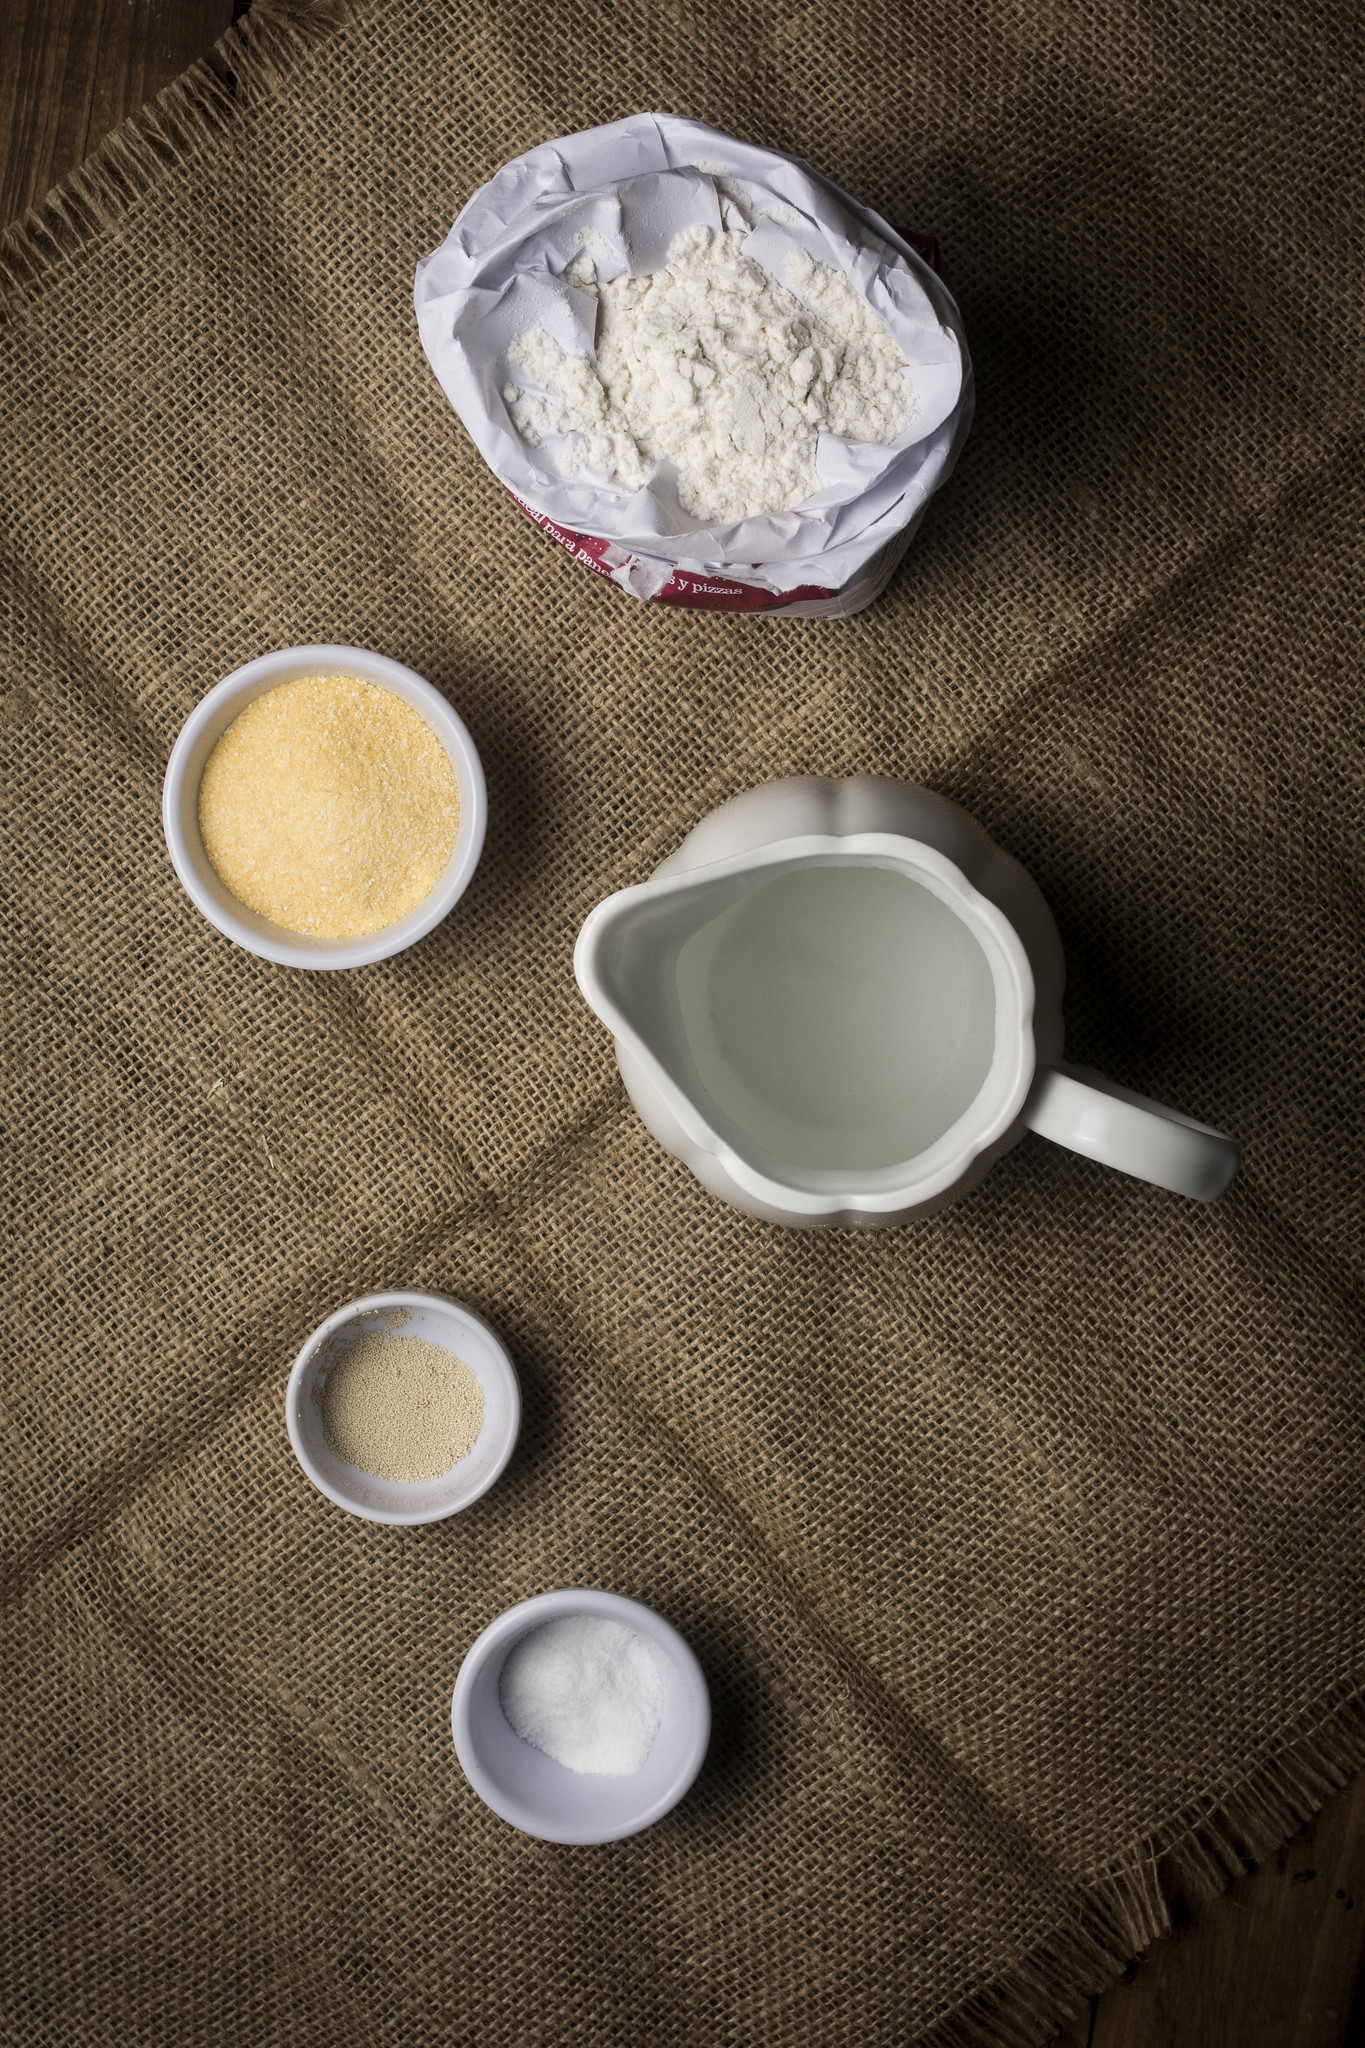
Ingredient notes
You do not need many ingredients to make these ciabatta rolls, but the few you use do matter. Bread flour, water, salt, a tiny amount of yeast and a little semolina or fine polenta are enough to create rustic rolls with a crisp crust and chewy, open crumb.
Strong white bread flour
Use strong white bread flour rather than plain flour. Ciabatta needs enough structure to hold its air pockets, and bread flour gives the dough the strength it needs while still keeping the finished rolls light and chewy.
Different brands of flour absorb water slightly differently, so your dough may feel a little looser or firmer depending on what you use. It should still be wet, sticky and soft rather than smooth and easy to handle.
Water
This is a high-hydration dough, which simply means there is a lot of water in relation to the amount of flour. That wetness is what helps create ciabatta’s open crumb and slightly chewy texture.
Use lukewarm water rather than hot water. If the water is too hot, it can damage the yeast; if it is very cold, the dough will rise more slowly.
Instant or fast-action yeast
You only need a tiny amount of yeast for this recipe because the dough rises slowly overnight. That long rise gives the rolls better flavour and texture than a quick bread dough.
One gram of instant or fast-action dried yeast is roughly 1/4 teaspoon. If your scales do not measure such small amounts accurately, use a level 1/4 teaspoon instead. Do not add a whole 7 g sachet; it is far too much for this slow-rise dough.
Fine sea salt
Salt is essential for flavour, but it also helps strengthen the dough. Fine sea salt is best because it disperses evenly through the flour.
Semolina or fine polenta
Semolina or fine polenta helps stop the dough from sticking and gives the base of the rolls a lovely texture. It also adds to that rustic bakery-style finish.
If you do not have semolina or polenta, use extra flour for dusting instead. The rolls will still work.
Photograph: Maxi Gagliano
Useful equipment
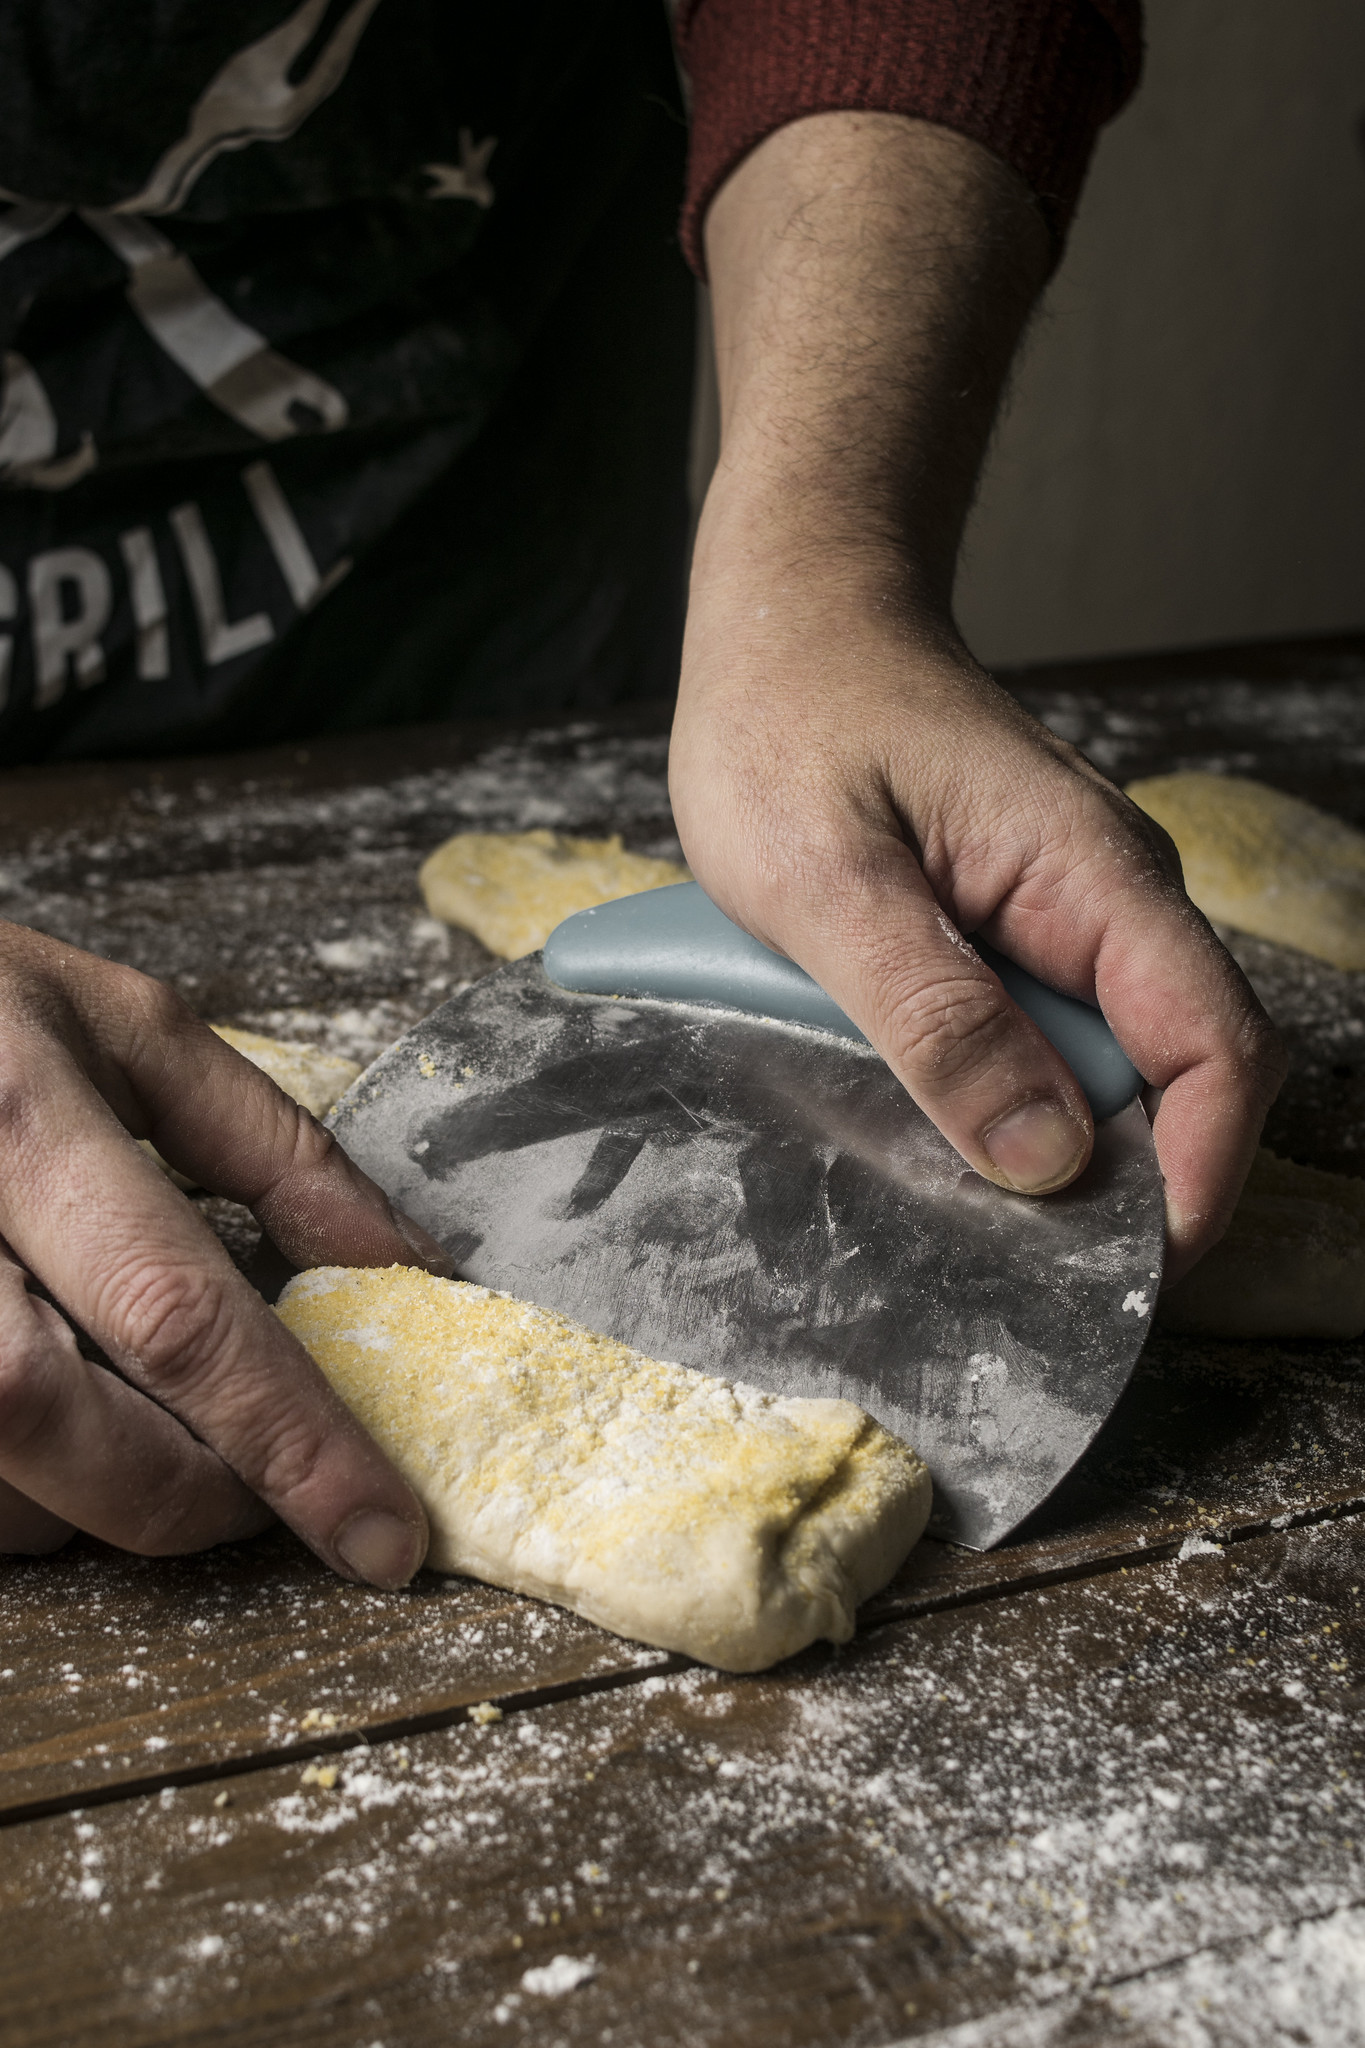
You do not need specialist equipment to make these ciabatta rolls, but a dough scraper is very useful. The dough is wet and sticky, so a scraper makes it much easier to lift, shape and divide without knocking out too much air.
You will also need a large mixing bowl, baking parchment, baking trays and a clean tea towel for covering the rolls while they prove. If you want a crisper crust, an empty roasting tin in the base of the oven can be used to create steam at the start of baking.
If you are building up your baking kit, I keep a small edit of the bread-making tools and kitchen items I use or recommend here: shop my kitchen edit.
Why no-knead bread works
Yeast baking can make home bakers nervous, but it is often the kneading rather than the yeast itself that causes the most worry. Traditional bread recipes can assume you already know how dough should feel: when it is too sticky, when it is smooth enough, when it has been worked enough, and when to stop.
For many of us, that was not a skill taught at school or passed down at home. Bread making is becoming popular again, but there is still something wonderfully freeing about a recipe that does not ask you to judge perfect kneading technique.
With no-knead bread, time does much of the work. The long, slow rise allows the flour to hydrate, the gluten to develop and the flavour to build without needing a stand mixer or confident hand-kneading. A couple of gentle folds help give the dough structure, but there is no need to thump it about on the worktop.
That makes this recipe a lovely place to start if you like the idea of homemade bread but feel less sure about traditional kneading. The dough will look wet and sticky, and that is exactly as it should be.
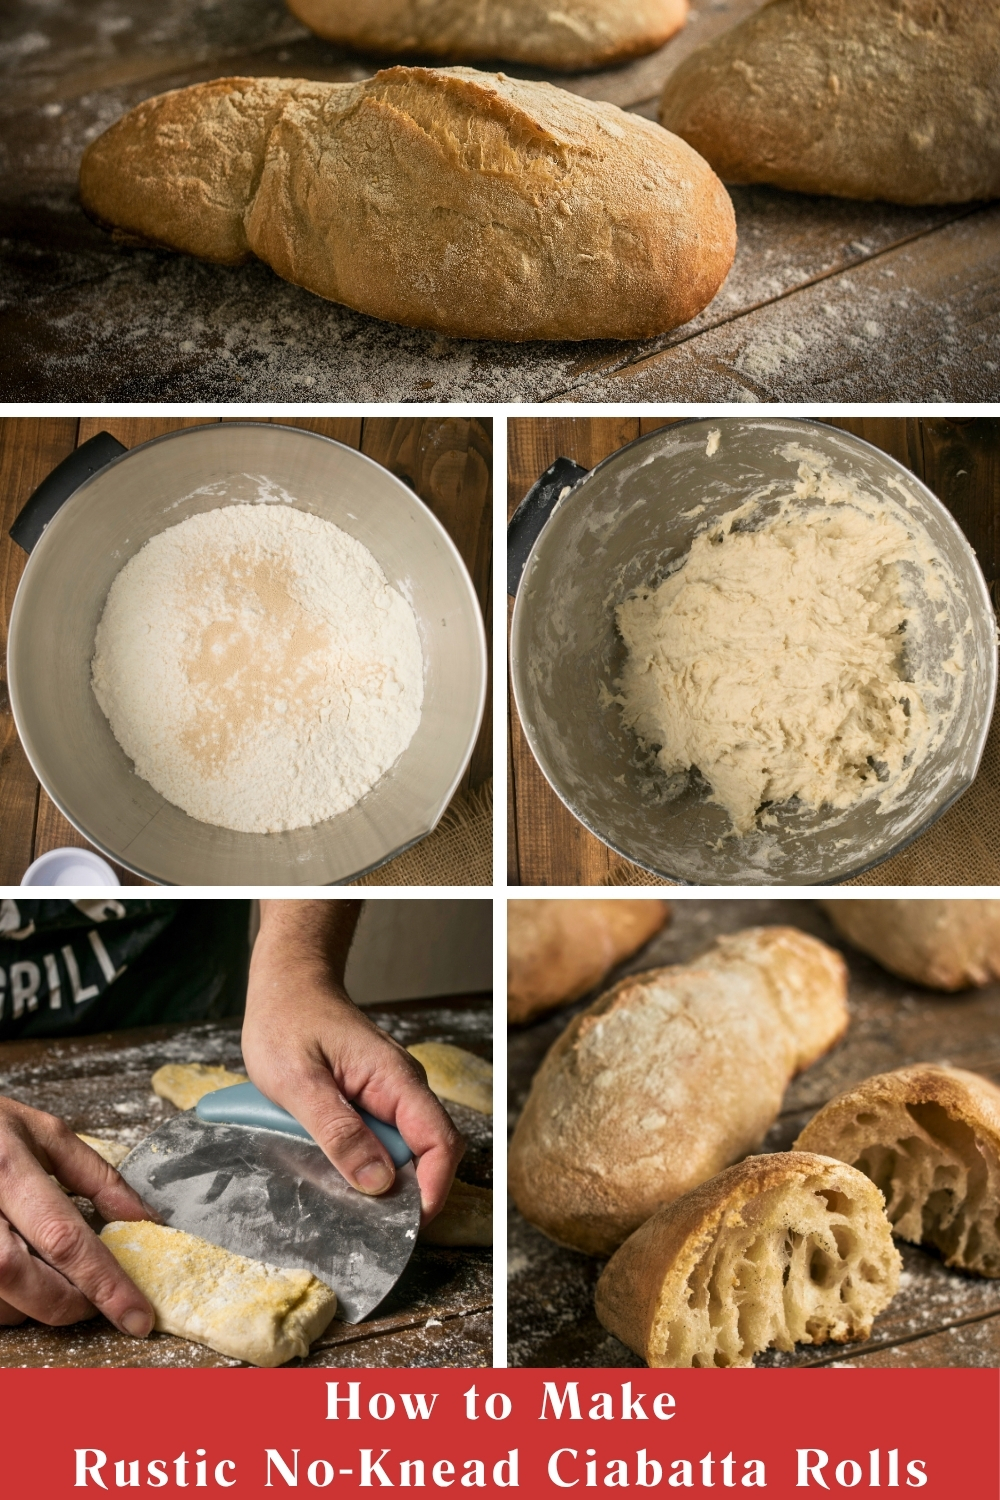
How to make no-knead ciabatta rolls
This is a slow recipe, but not a complicated one. The dough needs an overnight rise, so the best approach is to mix it the evening before you want to bake, then shape and bake the rolls the following day.
Start by mixing the flour, salt and yeast in a large bowl. Add the water and stir until there are no dry patches of flour left. The dough will look wet, shaggy and sticky at this stage. That is normal for ciabatta, so try not to be tempted to add lots of extra flour.
After a short rest, give the dough a few gentle folds. You are not kneading it in the traditional sense. Wet your hand, lift one side of the dough and fold it back over itself, then turn the bowl and repeat. This helps build strength in the dough while keeping the recipe very low-effort.
Repeat the folding once more, then cover the bowl and leave the dough to rise slowly. By the next day, it should look risen, bubbly and full of air pockets. This is when the dough starts to feel much more promising.
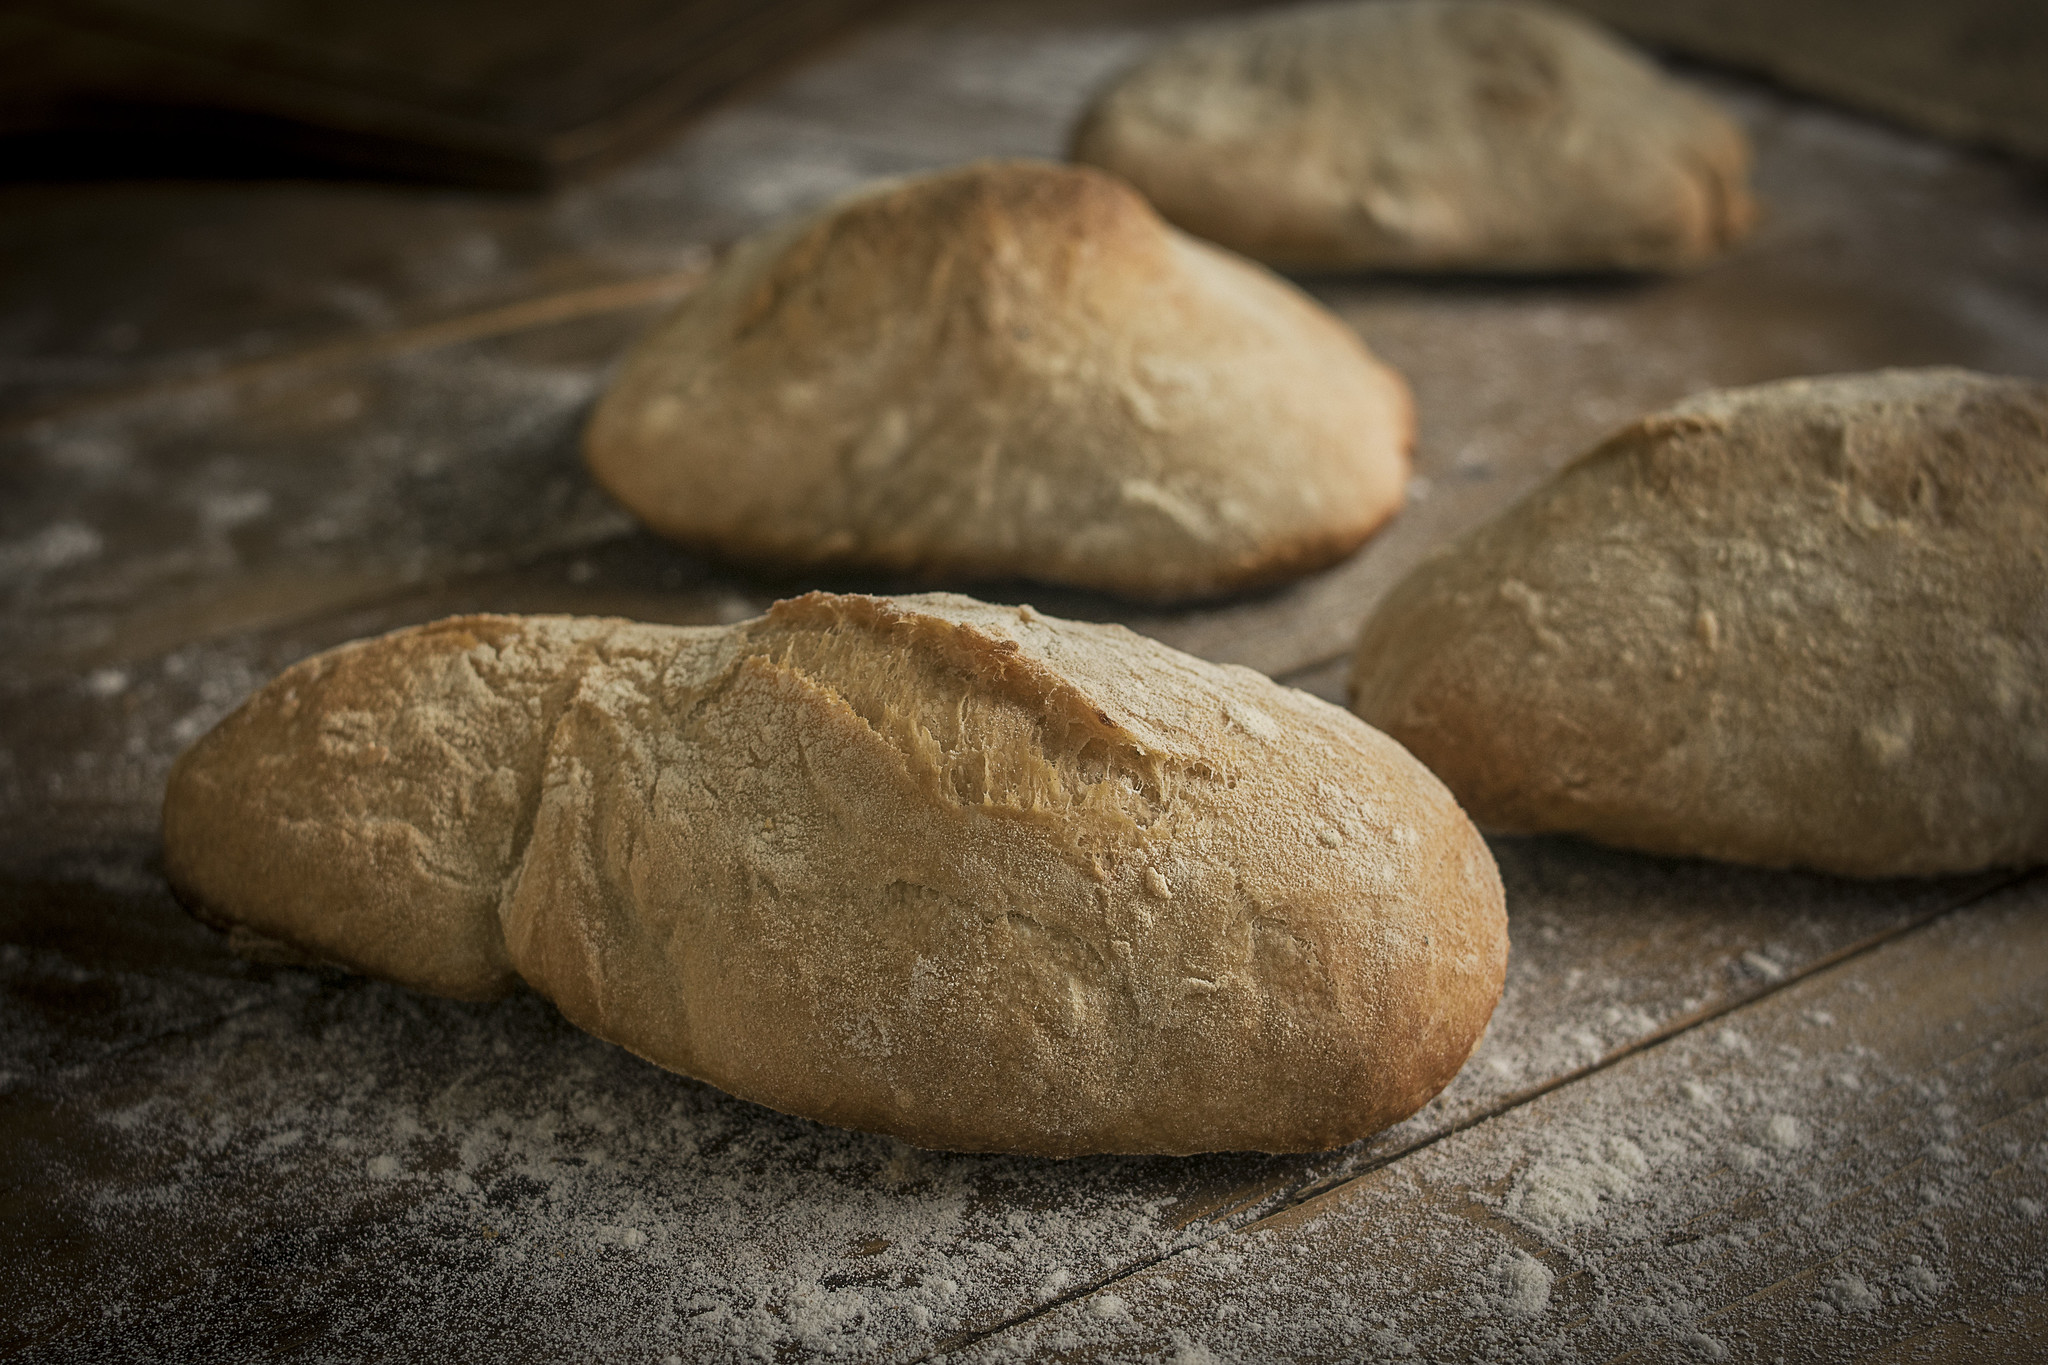
When you are ready to shape the rolls, generously flour your work surface and dust it with semolina or fine polenta. Tip the dough out gently and try to keep as much air in it as possible. Use a dough scraper to ease it into a rough rectangle, then cut it into individual rolls.
Photograph: Maxi Gagliano
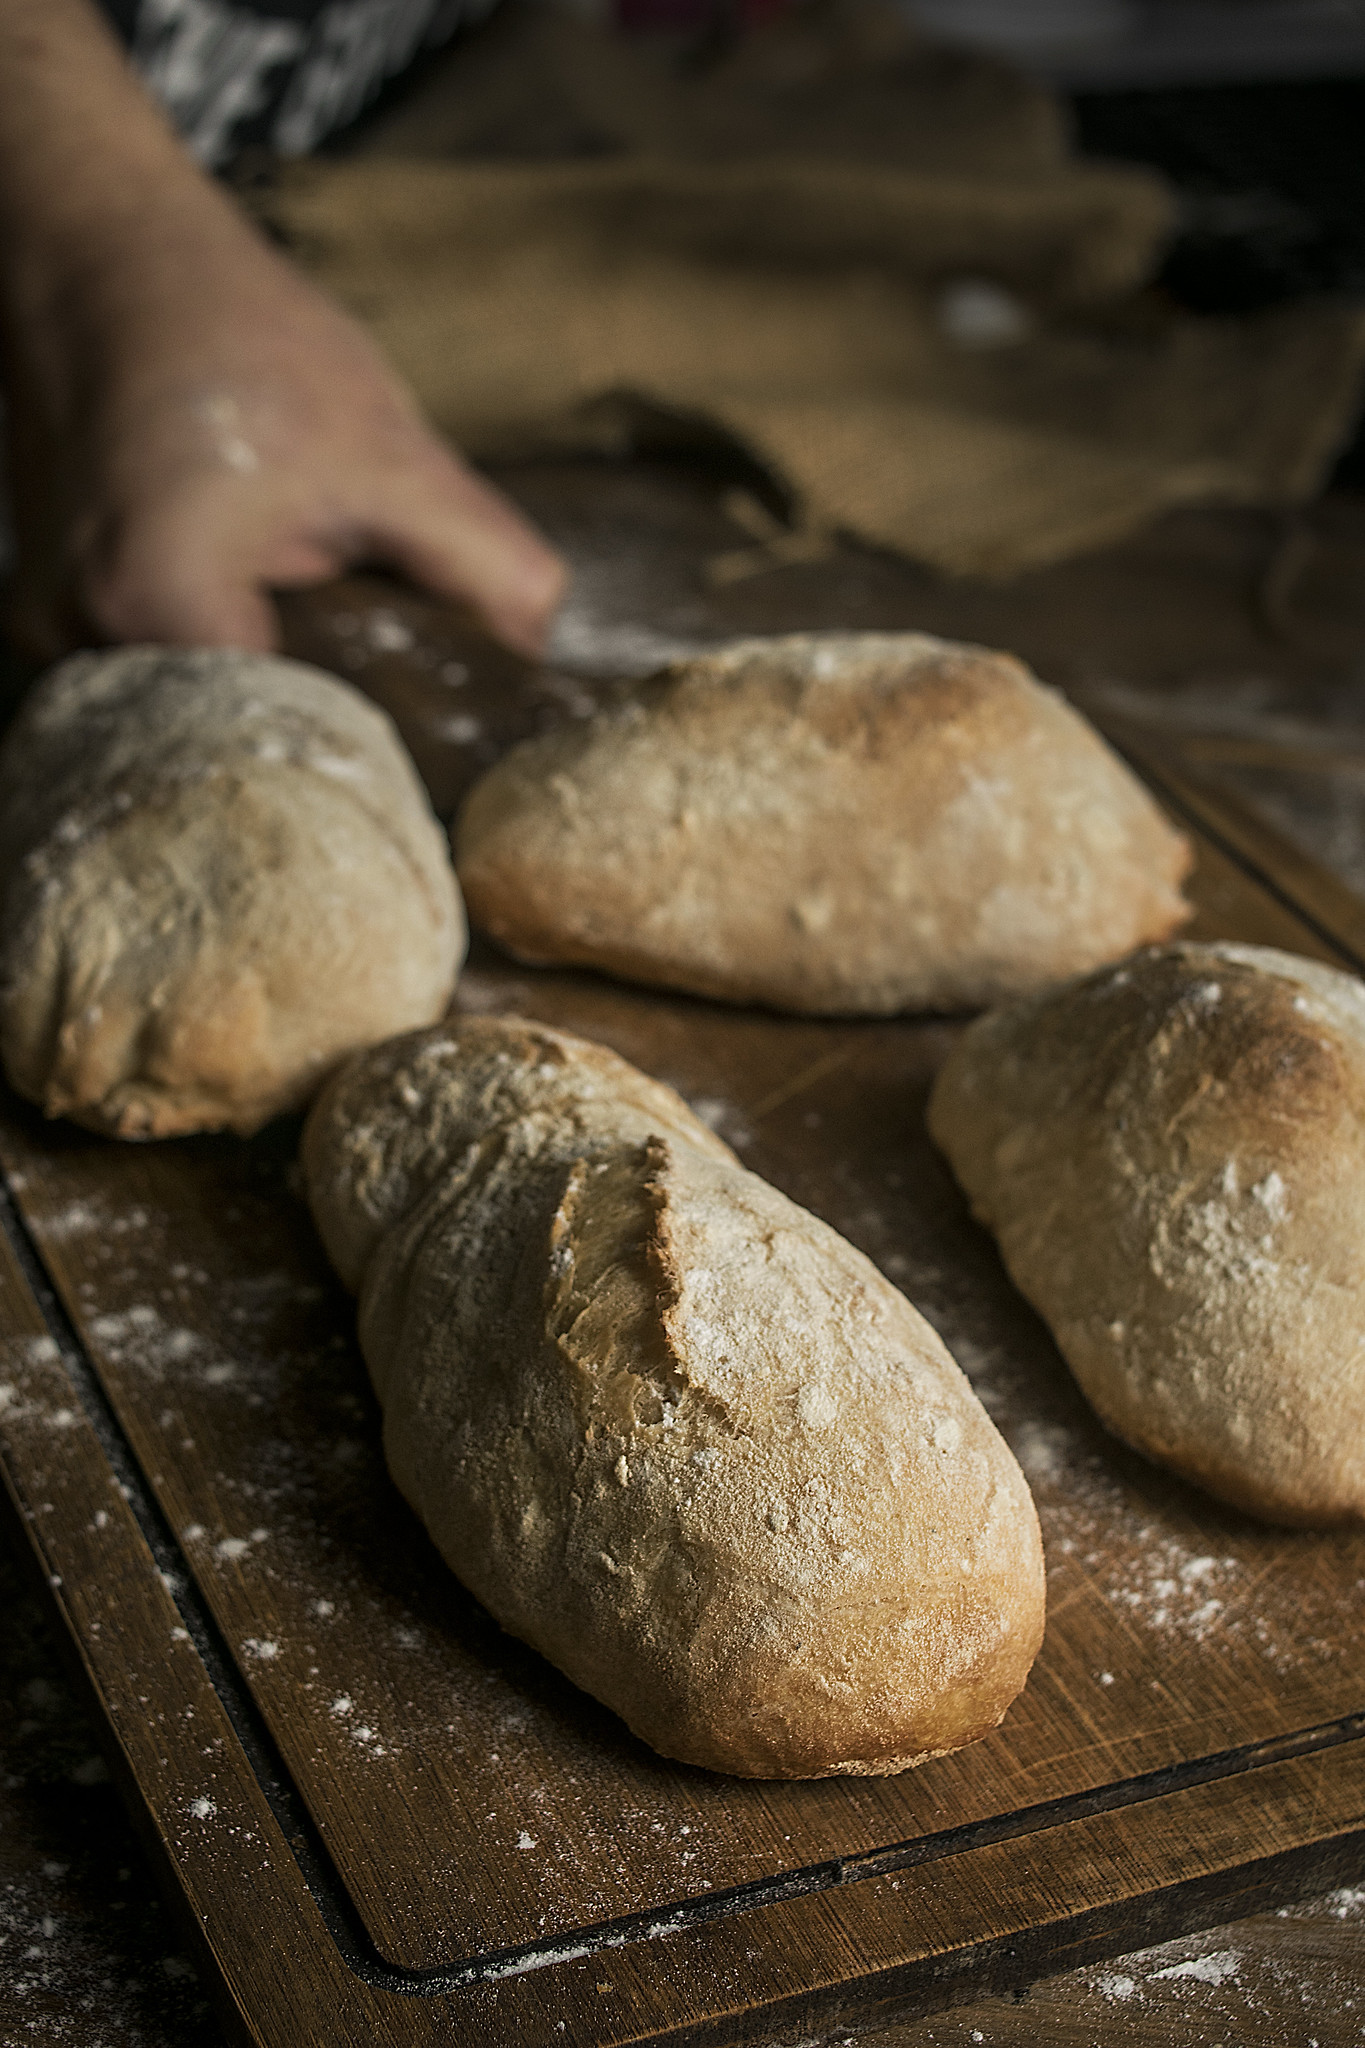
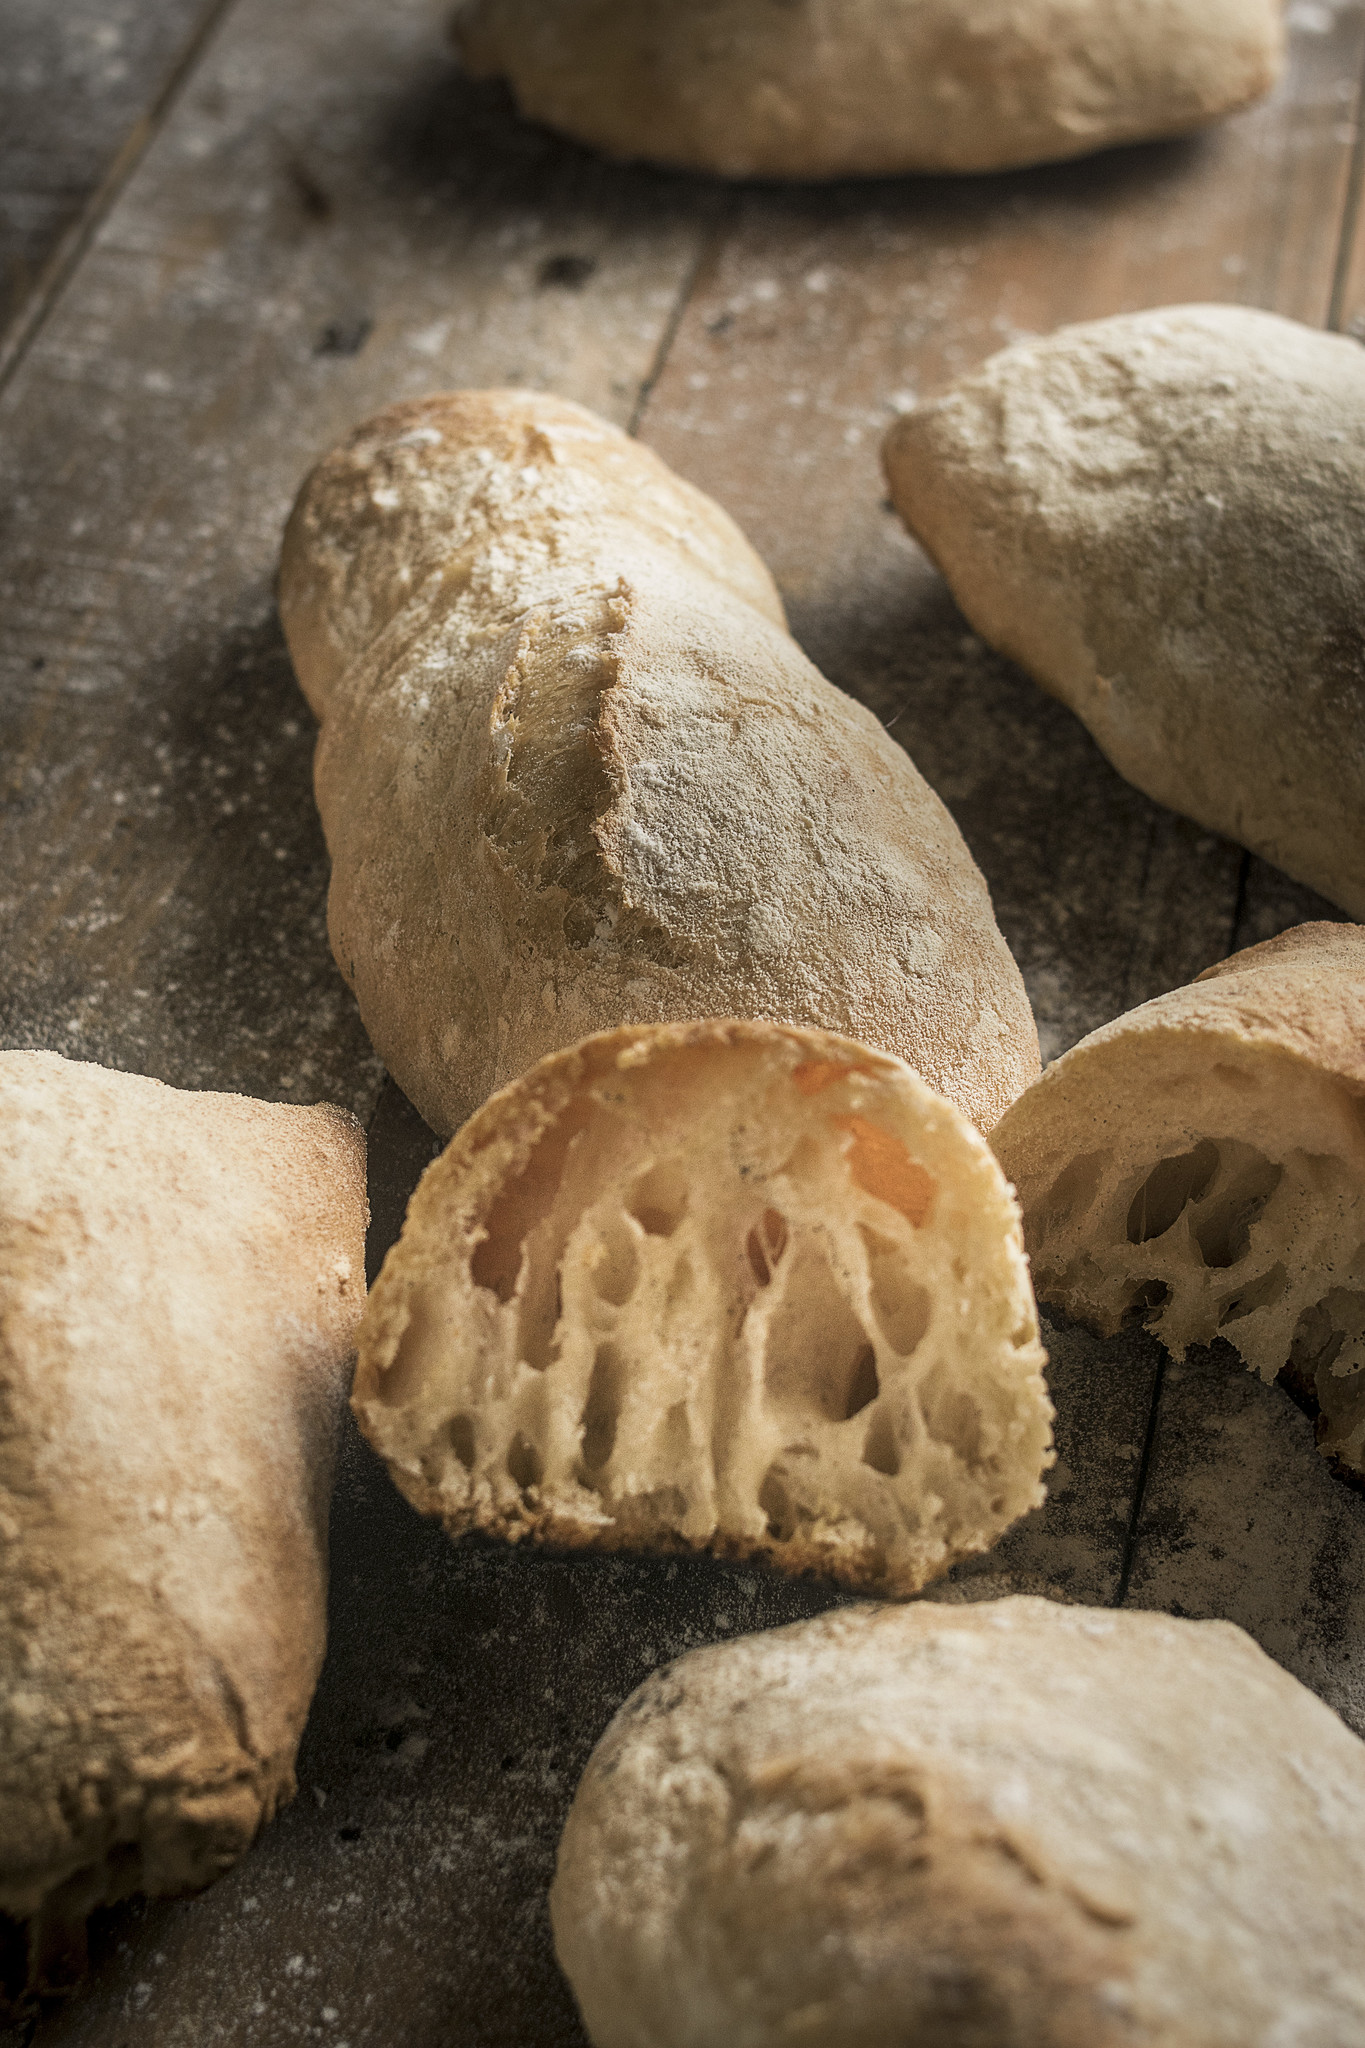
The rolls should look rustic rather than neat. Ciabatta is meant to have character, so do not worry if each roll is a slightly different shape. Transfer them carefully to lined baking trays, leave them to prove briefly, then bake in a hot oven until golden, crisp and hollow-sounding underneath.
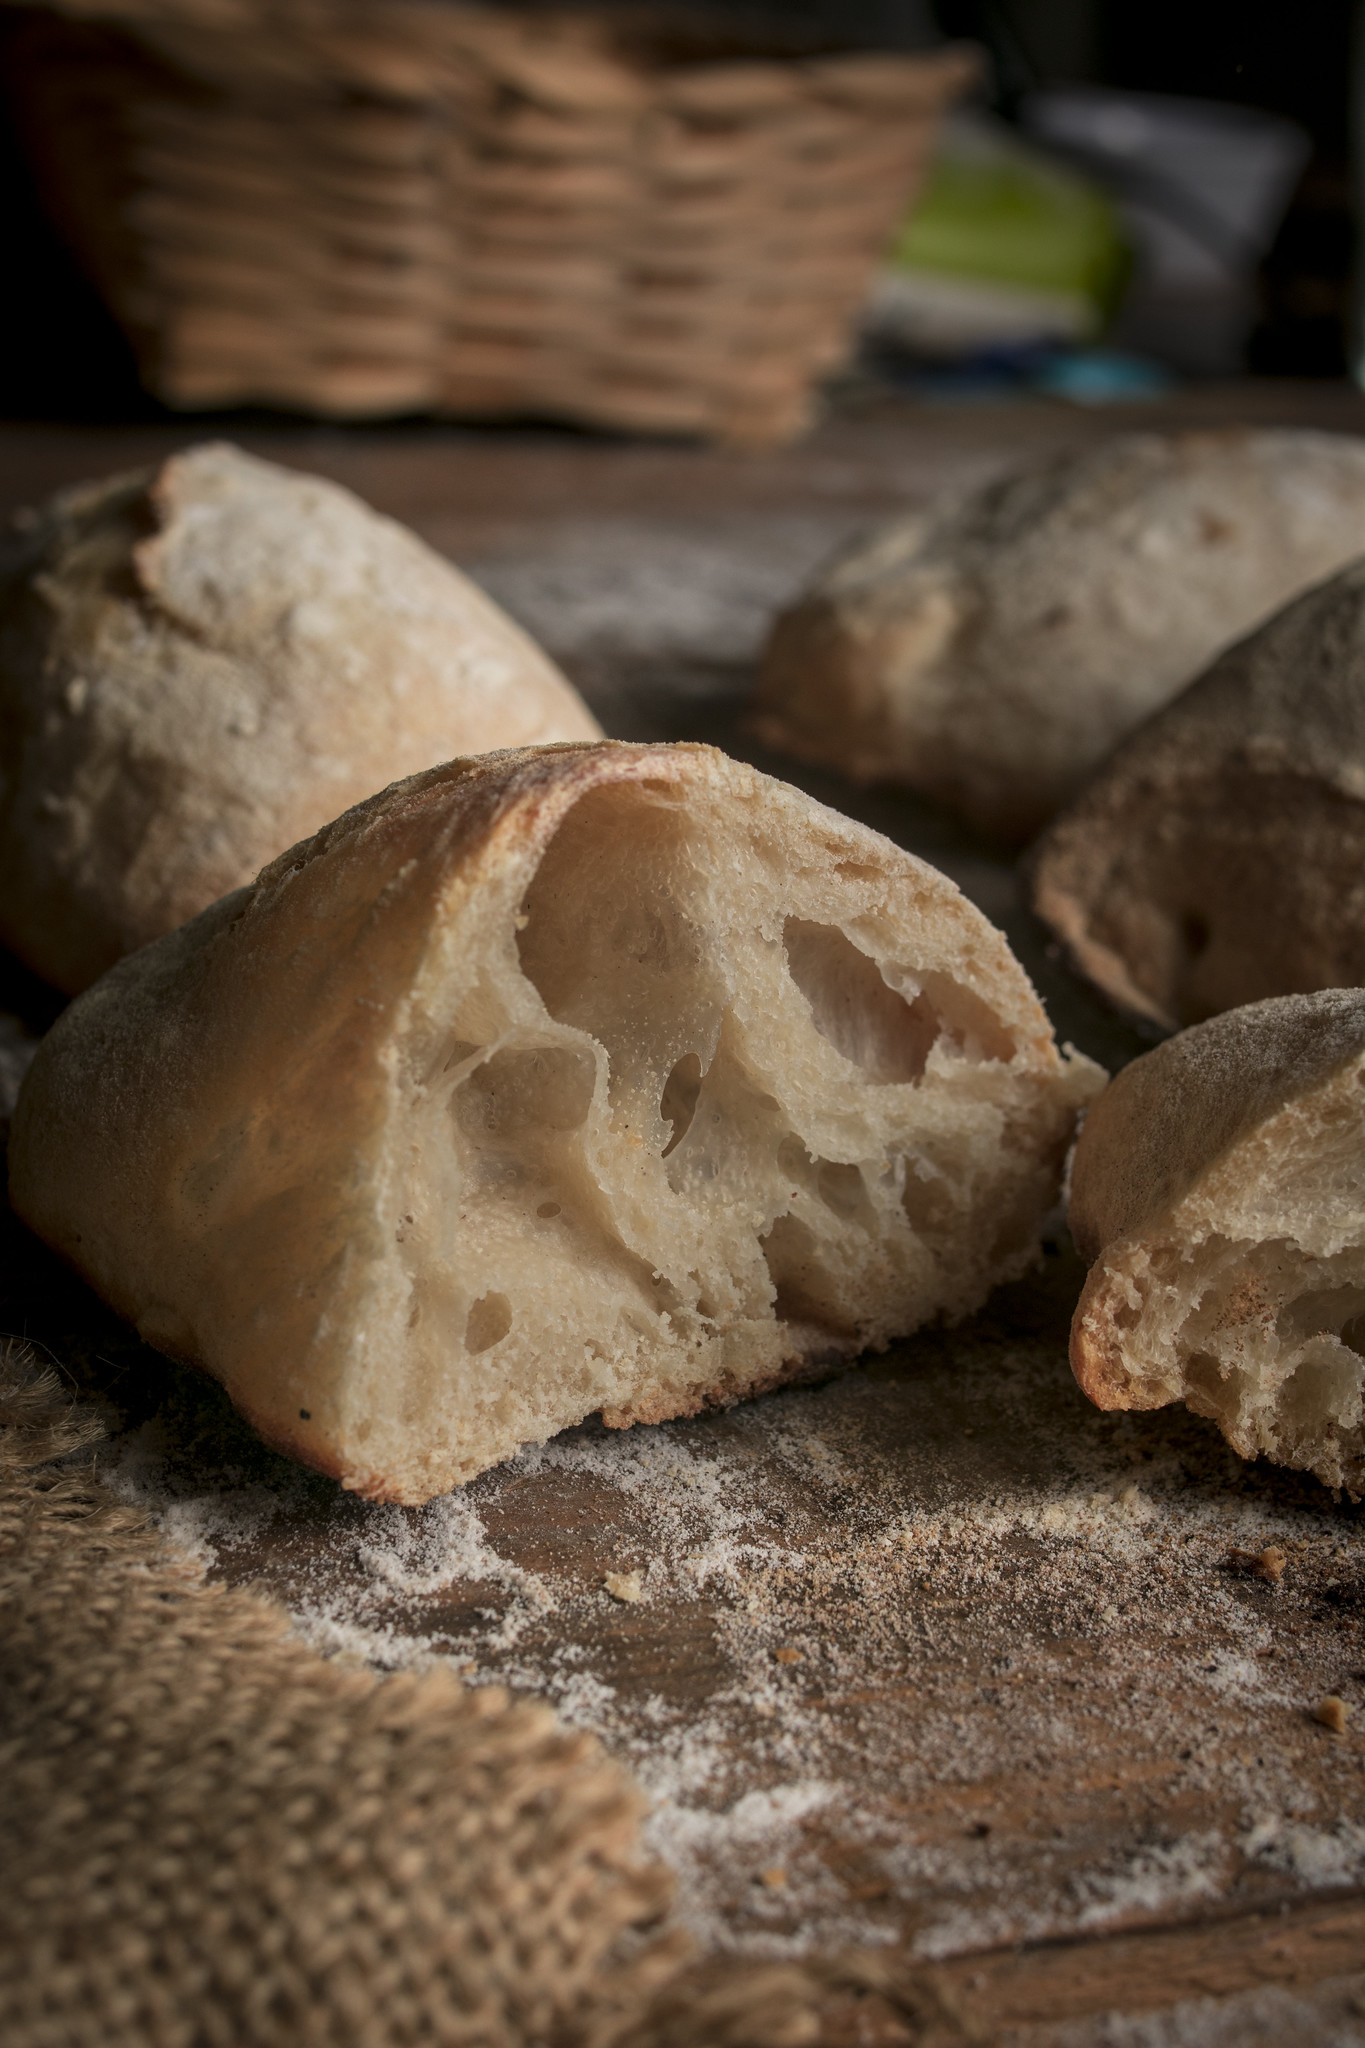
Once baked, let the rolls cool on a wire rack before slicing. The crust will firm up as they cool, and the interior should be light, chewy and full of those lovely irregular holes.
Photograph: Maxi Gagliano
Tips for success
Do not panic about the wet dough
Ciabatta dough is supposed to be wet, sticky and loose. It will not look like a neat ball of bread dough, and it will not be easy to handle in the way a standard white loaf might be. That wetness is what helps create the open crumb and chewy texture.
Use the folds to build strength
The gentle folds at the beginning of the recipe are worth doing. They help the dough develop structure without traditional kneading, which is especially useful if your flour absorbs water differently or the dough looks very slack.
Bread responds to the weather
One of the most useful things to remember with bread is that dough responds to the conditions around it. A warm kitchen, a summer heatwave, a humid day, a cold winter room, altitude and even the flour you use can all affect how quickly the dough rises and how loose or strong it feels.
In warm weather, the dough may rise much faster than expected, so check it earlier rather than leaving it automatically for the full overnight rise. In a cooler kitchen, it may need longer. Around 24–25°C is a helpful guide, but the dough itself matters more than the clock.
What you are looking for is dough that has risen well, looks bubbly and shows visible air pockets. If it still looks flat and heavy, give it more time. If it has risen dramatically and looks very fragile, move on to shaping before it overproofs.
Watch the dough, not just the clock
The timings in this recipe are a guide. The dough will not behave in exactly the same way every time, and that is normal. Learn to look for the signs: bubbles on the surface, air pockets through the sides of the bowl, a slightly domed surface and a dough that feels alive rather than dense.
Be generous with flour and semolina on the work surface
Use enough flour and semolina to stop the dough sticking when you tip it out and divide it. Try to keep that flour on the outside rather than kneading it into the dough, as adding too much extra flour can make the finished rolls heavier.
Handle the dough gently
Once the dough has risen, treat it carefully. You want to keep as much of the trapped air as possible, so avoid pressing, kneading or reshaping it too much. A dough scraper is very useful here.
Do not aim for perfect shapes
Ciabatta rolls should look rustic rather than perfectly uniform. Uneven edges, floury tops and slightly irregular shapes are all part of their charm. This is homemade bread, not factory bread, and if the rolls look handmade, you are doing it right.
Bake in a properly hot oven
A hot oven helps the rolls puff, crisp and colour well. Preheat the oven fully before baking, and avoid opening the door too often once the rolls go in.
Let them cool before slicing
Fresh bread is tempting, but ciabatta needs a little time to settle after baking. Let the rolls cool on a wire rack before cutting into them so the crumb has time to finish setting.
Photograph: Maxi Gagliano
Serving suggestions
These ciabatta rolls are wonderfully versatile, which is one of the reasons they are worth making as individual rolls rather than large loaves. They are sturdy enough for sandwiches, rustic enough for the table and useful enough to keep in the freezer for quick meals.
For hot sandwiches
Ciabatta rolls are excellent for hot sandwiches because they can cope with generous fillings without falling apart too quickly. Try them with roasted vegetables and mozzarella, mushrooms and melted cheese, grilled aubergine, or leftover roast meats if you eat them.
They would also be perfect for porchetta-style pork, salsa verde and a handful of bitter leaves. That is the kind of sandwich that always reminds me of Italy: simple bread, good filling, plenty of flavour and very little fuss.
For cold sandwiches and lunchboxes
These rolls work well for cold sandwiches too, especially if you avoid making the filling too wet. Tomatoes, mozzarella, basil, roasted peppers, pesto, hummus, grilled vegetables, cheese, salad leaves and antipasti-style fillings all sit happily inside ciabatta.
For lunchboxes or picnics, let the rolls cool completely before filling them. If you are using juicy ingredients, spread something protective on the bread first, such as butter, pesto, hummus or a little cream cheese, to stop the roll becoming soggy too quickly.
For picnics and packed lunches
Because they are individual rolls, they are easy to wrap, pack and take out with you. They feel a little more substantial than soft sandwich rolls, which makes them especially good for picnics, road trips, train journeys and packed lunches that need to hold up for a few hours.
For scarpetta
Ciabatta is also exactly the kind of bread you want for scarpetta: the very Italian pleasure of using bread to mop up the last of a sauce from your plate. Serve these rolls with ragu, tomato sauce, soups, stews, olive oil, or anything with juices worth chasing around the bowl.
For croutons, garlic bread, bruschetta and panzanella
Homemade bread does not usually stay soft for as long as shop-bought bread, partly because it does not contain the same preservatives or softening agents. That is not a bad thing; it just means the leftovers are best used differently.
Day-old ciabatta rolls are excellent split and turned into garlic bread, sliced and toasted for bruschetta, or cut into cubes for croutons. The chewy texture means they crisp well without disappearing into crumbs.
They are also perfect for panzanella, the Tuscan bread salad made with stale bread, ripe tomatoes, olive oil and vinegar. It is one of those dishes that makes a virtue of bread that has gone a little firm, soaking up all the tomato juices and dressing without collapsing completely.
You can also tear leftover ciabatta into rough pieces for bread salads, serve it with antipasti, or keep it for scarpetta: mopping up the last of a sauce, soup or stew from the plate.
Photograph: Maxi Gagliano
Storage and freezing
These ciabatta rolls are at their best on the day they are baked, once they have cooled enough for the crumb to settle. Like most homemade bread, they do not stay soft for as long as shop-bought rolls because they do not contain the same preservatives or softening agents.
Store leftover rolls in a paper bag or bread bin for a day or two. To refresh them, place them in a hot oven for a few minutes until the crust crisps up again.
They also freeze well. Let the rolls cool completely, then freeze them in an airtight bag or container. Defrost at room temperature and warm briefly in the oven before serving.
Once the rolls start to firm up, use them for garlic bread, bruschetta, croutons or panzanella rather than expecting them to behave like soft sandwich rolls.
No-Knead Ciabatta Rolls
Yield: 8 ciabatta rolls
Prep time: 20 minutes hands-on time
Rise time: 12–18 hours, plus 45–60 minutes proving
Cook time: 18–22 minutes
Total time: Approximately 14–20 hours, mostly inactive
Ingredients
500 g strong white bread flour, plus extra for dusting
7 g fine sea salt
1 g instant yeast, or 1/4 teaspoon if your scales do not measure very small amounts accurately
400 g lukewarm water
Fine semolina or fine polenta, for dusting
Method
1. Place the flour, salt and yeast in a large mixing bowl and stir to combine.
2. Add the lukewarm water and mix with a spoon, dough whisk or clean hand until no dry patches of flour remain. The dough will be very wet, sticky and shaggy.
3. Cover the bowl and leave the dough to rest for 30 minutes.
4. With a wet hand, lift one side of the dough and fold it back over itself. Turn the bowl slightly and repeat three or four times, working your way around the dough. Cover again and leave to rest for another 30 minutes.
5. Repeat the folding process once more. Cover the bowl and leave the dough at room temperature for 12–18 hours, until risen, bubbly and full of visible air pockets.
6. Generously flour your work surface and dust it with semolina or fine polenta. Carefully tip the dough out of the bowl, trying to keep as much air in it as possible.
7. Using a dough scraper, gently ease the dough into a rough rectangle. Do not knead it or press out the air.
8. Cut the dough into 8 roughly equal pieces. The rolls will look rustic and irregular rather than neat.
9. Transfer the rolls carefully to baking trays lined with baking parchment and dusted with semolina or fine polenta. Leave space between them, as they will spread and puff slightly.
10. Cover loosely with a clean tea towel and leave to prove for 45–60 minutes, until slightly puffed.
11. Meanwhile, preheat the oven to 240°C / 220°C fan. For a crisper crust, place an empty roasting tin on the bottom shelf of the oven while it heats.
12. When the rolls are ready to bake, place the trays in the oven. Carefully pour a little hot water into the roasting tin to create steam, then close the oven door quickly.
13. Bake for 18–22 minutes, until the ciabatta rolls are golden, crisp and sound hollow when tapped underneath.
14. Transfer to a wire rack and leave to cool before slicing.
Notes
The dough should be wet and sticky. Avoid adding lots of extra flour, as this can make the finished rolls heavier.
If your kitchen is very warm, check the dough earlier during the overnight rise. If your kitchen is cool, it may need closer to the full 18 hours.
The rolls are best eaten on the day they are baked, but they can be refreshed in a hot oven for a few minutes or frozen once completely cool.
FAQs
Why is ciabatta dough so wet?
Ciabatta is a high-hydration bread, which means it contains a lot of water in relation to the flour. That wet dough helps create the open crumb, chewy texture and rustic shape. It can feel alarming if you are used to firmer bread doughs, but it is meant to be sticky, loose and a little unruly.
Can I make these ciabatta rolls without kneading?
Yes. This recipe does not need traditional kneading. The long rise allows the dough to develop flavour and structure over time, while the gentle folds at the beginning help strengthen it without needing confident kneading technique or a stand mixer.
Why did my ciabatta rolls turn out flat?
Ciabatta is naturally flatter than many bread rolls, but if the rolls are very flat and dense, the dough may have been underdeveloped, overproofed or handled too heavily during shaping. Make sure the dough looks bubbly and risen before shaping, use the folds to build strength, and be gentle when tipping and cutting the dough.
Can I use fresh yeast, instant yeast or fast-action yeast?
Yes, but the quantity matters. Fast-action dried yeast and instant yeast can usually be used in the same way in this recipe, so use 1 g, or about 1/4 teaspoon. Do not use a whole 7 g sachet, as this recipe is designed for a slow overnight rise.
If using active dried yeast, use about 1/3 teaspoon and dissolve it in the lukewarm water before adding it to the flour. If using fresh yeast, use about 3 g and crumble it into the water before mixing.
The aim is a slow fermentation rather than a quick rise, so it is better to use a small amount of yeast and give the dough time to develop flavour.
How do I know when the dough has risen enough?
The dough should look well risen, bubbly and full of visible air pockets. It should feel lighter and more alive than it did when first mixed. Timings are a guide, but the dough itself is the best indicator. In warm weather, it may be ready sooner; in a cooler kitchen, it may need longer.
Can I make the dough ahead?
Yes. The dough is designed for an overnight rise, so you can mix it the evening before you want to bake. If your kitchen is very warm, check it earlier, as the dough may rise more quickly than expected.
Can I use plain flour instead of strong bread flour?
Strong white bread flour is best for this recipe because it gives the dough enough structure to hold the air pockets. Plain flour may still make bread, but the rolls are likely to be softer, flatter and less chewy.
Can I freeze ciabatta rolls?
Yes. Let the rolls cool completely, then freeze them in an airtight bag or container. Defrost at room temperature and warm them briefly in a hot oven to bring back the crisp crust.
How long do homemade ciabatta rolls keep?
They are best on the day they are baked, but they will keep for a day or two in a paper bag or bread bin. Because homemade bread does not contain the same preservatives or softening agents as shop-bought bread, it will firm up more quickly. Once that happens, use it for toast, garlic bread, croutons, bruschetta or panzanella.
Can I make these as larger ciabatta loaves?
You can, but this version has been designed specifically as individual rolls for home ovens. Larger loaves will need more careful handling and a longer bake, and they can be harder to manoeuvre onto a standard baking tray.
Photograph: Maxi Gagliano
Final thoughts
These no-knead ciabatta rolls are the sort of recipe that proves bread does not have to be complicated to feel special. The dough asks for time rather than effort, and the reward is a batch of rustic rolls with crisp crusts, chewy middles and enough character to carry everything from a simple bowl of soup to a proper Italian-inspired sandwich.
They are not neat little bakery-perfect rolls, and they are all the better for it. Flour-dusted, irregular and full of texture, they are made for tearing open, filling generously, mopping through sauce, or saving for the kind of leftovers that become croutons, bruschetta or panzanella the next day.
If you have been nervous about yeast baking, this is a lovely recipe to start with. There is no complicated kneading technique, no mixer required and no need to make the dough behave like something it is not. Let it rise slowly, handle it gently and trust the process.
Photography for this recipe was commissioned by Culinary Travels and shot by Maxi Gagliano. Images are used with full usage rights granted to Culinary Travels for website, social media and print use.
Stay in Touch
Culinary Travels publishes destination guides, seasonal recipes, and food-led travel features from the UK and beyond.
Follow for new articles and updated travel resources:
Instagram | X | Facebook | Pinterest
Newsletter
Receive new guides, recipes, and occasional travel planning notes by email: Subscribe here
Reader feedback and local recommendations are always welcome via the contact page.
©2026 Culinary Travels. Culinary Travels is written and edited by Georgina Ingham | Website designed by The Smarter Web Company
What Our Followers Say
Our list of things to do in Cork has just expanded hugely thanks to Culinary Travels.
Triskel Art Centre Cork, via Twitter
“Tried this last night and it was delicious!”
Reader feedback via Pinterest, Yangzhou Fried Rice Recipe
"Oh yum!!! I could eat one or two right now!"
Sami Tamimi, via Instagram, on Ma’amoul Cookies
"Georgina was great to work with, quick to respond, and is a excellent content writer - would highly recommend"
Nick S - Get Blogged
“A simple no-knead dough transformed into beautiful, rustic rolls.”
Reader feedback via Pinterest, No-Knead Ciabatta Rolls Recipe